
Quarantine Knitting with Arne & Carlos
When California first went into stay-at-home mode in mid-March, I heard about the Arne & Carlos Quarantine KAL (knit-along) and jumped right in. It started off as a mystery KAL, but since we were knitting squares or “patches” (as Carlos calls them), participants quickly began to guess we’d end up with a blanket or a pillow, or perhaps a modular scarf. Turns out, you could choose to make whatever you wanted, but those were recommended (ha ha). Though the KAL is now officially over, the pattern and charts are still available (all FREE!) on the Arne & Carlos Blog, and you can watch each episode on their YouTube channel.
This KAL was more about conversation and community than it was about education and instruction. It assumed participants knew how to read charts and knit using two colors…and at the end, it assumed we knew how to turn our patches into something. I think, having seen Arne’s finished pillow, he chose not to add a border. I wanted a border on mine, and I think others might as well, so this blog gives instructions for exactly how I knit and finished my pillow, in case you’d like to do the same.
Susan’s “Arne & Carlos Quarantine KAL” Pillow
Susan's Materials
- 1 skein RUFF+TUMBLE DK in Black*
- 1 pair US 6 [4mm] straight 9" [23cm] needles (or longer)
- 1 pair US 6 interchangeable circular needle tips + 2 circular cables, 40" [100cm] long.
- 1 tapestry needle
- 4 locking stitch markers
*Patches each required less than ½ oz [14.17g] each of two colors (MC & CC).
Complete the number of patches you need for your project.
First off, I want to emphasize that the patterns for each patch are the sole property of Arne & Carlos. Please visit their blog to download the pattern and charts, and complete your patches as they instruct.
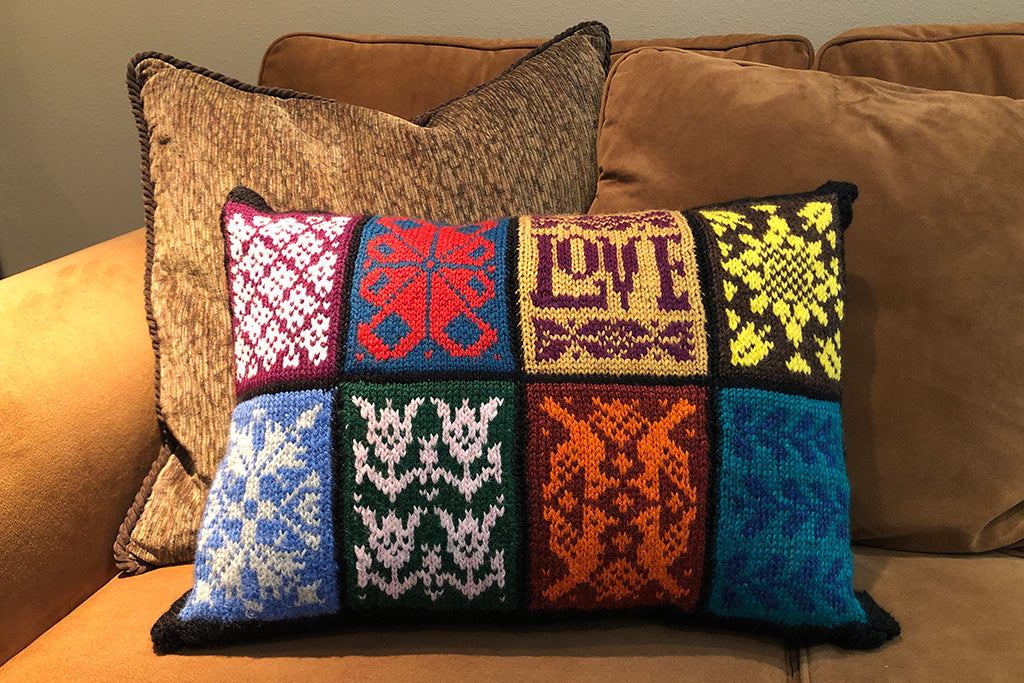
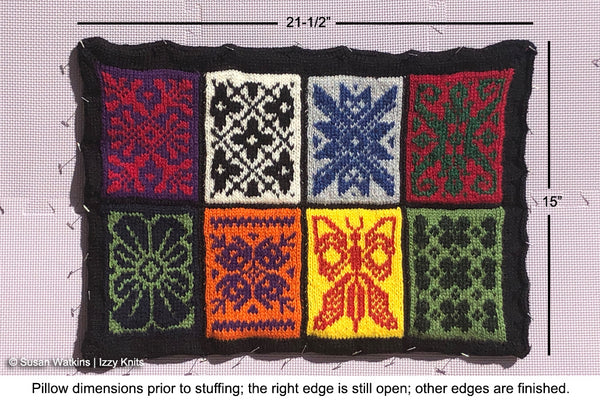
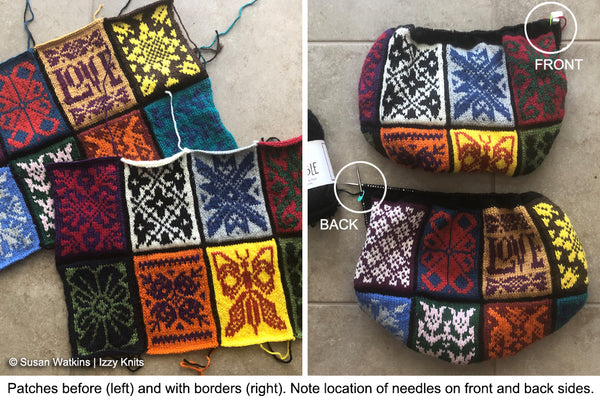
As you will see, Arne’s patches are lovely squares measuring approx. 13cm x 14cm [5-1/8" x 5-1/2"] after blocking. Not mine! My “squares” are all consistent in their size, but they are decidedly rectangular, measuring 4-3/4" x 7" [12cm x 17.78cm]. So when I put them together, I had a decision to make…did I want 8 per side for a rectangular pillow (as shown) or 12 per side for more of a square pillow. Then, I doubled that, since I wanted a two-sided pillow to show off more of my RUFF+TUMBLE DK colors. That meant I needed a grand total of 16 patches…which is a lot, but Arne & Carlos designed 27! (If you want to knit a smaller number of patches, consider knitting a solid back side or even back your pillow with fabric.) I ended up knitting 18 patches, then chose the 16 I thought looked best together. Based on the size of my patches plus an additional 1" border, the finished dimensions for my pillow (unstuffed!) are 21-1/2" x 15" [54.6cm x 38.1cm].
TIP: I knit all of my patches on straight needles, and I only wove in the ends of the CC yarn. I left the MC ends loose, as they became secured once the edging was added. The less weaving of ends, the better, in my opinion!
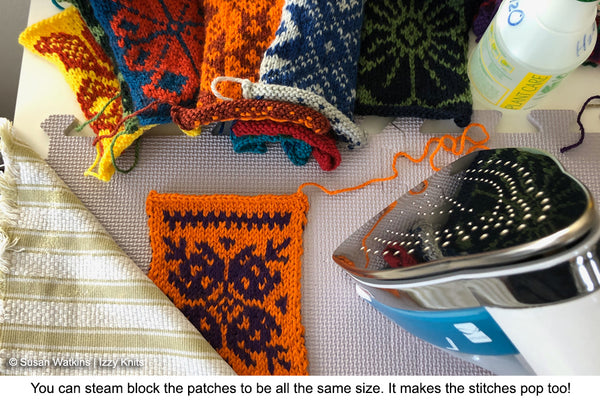
Steam block each patch to enhance uniformity.
I waited to finish all my patches before steam blocking them. It was much easier that way, since getting the equipment our daily would have been a hassle. To steam block, you need a heat/moisture-resistant surface (I protected my table with my blocking mats), a squirt bottle of water, a lightweight cloth or towel, and an iron. Place the dampened cloth over the patch and iron, gently shaping the patch into the desired shape while making sure not to burn your fingers. My technique improved with each patch!
Knit patches together using duplicate stitch.
I originally assumed I would use mattress stich to seam my patches together, but Arne actually demonstrated a way to do it using, essentially, a duplicate stitch. What I loved about this technique is that it creates a very flat seam. So, if you’d like to see this technique demonstrated by Arne on video, it’s Episode 16 of the KAL podcast on YouTube (demo starts at approx. minute 9.15). Below, you can view my photos to see where you will knit the duplicate stitches to join your patches, first vertically in three (3) columns, and then horizontally in one (1) long row.
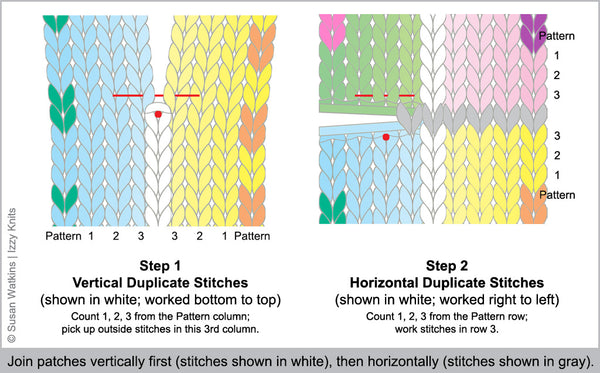
Your duplicate stitch is all done with a tapestry needle. In the illustrations above, the red dot marks where your needle will go up and down through the fabric. The red “bar” indicates where your needle will slip behind the legs of existing stitches. When you’re finished, you’ll have two (2) pieces of 8 patches each, a front and a back, neither of which has a border yet.
Add border to FRONT SIDE.
To knit the borders, I recommend using two (2) 40" long cables with interchangeable tips. A 40" cable is long enough to accommodate all the stitches you will have on your needle once you’ve finished the border and will allow you to keep the stitches on the cable so they remain “live” for a three-needle bind off.
For the border on the FRONT side, start at the top right corner of your sewn-together patches, picking up stiches 1 for 1 around all four sides of your piece, placing markers at all four corners. You may want a marker of a different color at the top right corner to indicate beginning of round (BOR). Then, beginning knitting your border as follows for 7 rounds (or approx. 1" [2.54cm]): *K1, k1f&b, knit to 1 st before marker, k1f&b, slip marker; repeat from * to BOR.
Leave all stitches on the cable (use end stoppers to ensure they don’t slip off!) and switch your needle tips to the second cable.
Add border to BACK SIDE.
For the border on the BACK side, start at the top left corner of your sewn-together patches, following the instructions above. It’s crucial you start at the top LEFT corner. If not, your needles will not be in the proper place to begin the three-needle bind off in the next step.
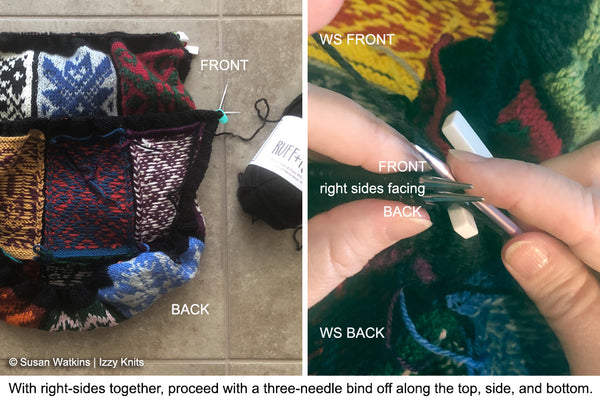
Seam and bind off simultaneously along top, left, and bottom.
In preparation for the three-needle bind off, you need your FRONT and BACK sides to be facing one another with right sides facing (shown below left). You will need to adjust your needles so that you have two tips facing right (one for the FRONT and one for the BACK as shown below right) and an end stopper on the other end of each cable. With a third needle, begin knitting stitches off the needles together as if they were on one needle and bind off as you normally would with each stitch knit. My favorite video demonstrating this technique is by Staci Perry on her YouTube channel, VeryPink Knits.
Stuffing the pillow is a personal choice.
At this point, your pillow is almost done! Turned right-side-out, it looks like a pillow…albeit a flat one! Now for the stuffing. Depending on the size of your pillow, you may find an insert at a store like JOANN Fabric & Crafts that’s just the right size. Or, you may need to stuff your pillow with your preferred stuffing material. I used a full 12 oz bag of The Original Poly-fil®, which I stuffed first into a quick case that I made from dark fabric (so the stuffing wouldn't slowly work it's way out). You could also stuff a pillow protector, if you have an extra one laying around. Or, of course, you could simply place your stuffing material straight into the pillow. It’s up to you.
Since this will be used as a display, I’m not worried about having to wash it. If I were, I might figure out how to put a zipper in it so I could take the stuffing out and throw it in the washing machine. RUFF+TUMBLE DK is super family-friendly, made for the washer and dryer! In fact, it gets softer with each wash.
Finish it off with mattress stitch.
Once the pillow has been stuffed, all that’s left for you to do is to close the open side using Mattress Stitch. Staci Perry has another great video demonstrating this technique. And voila!